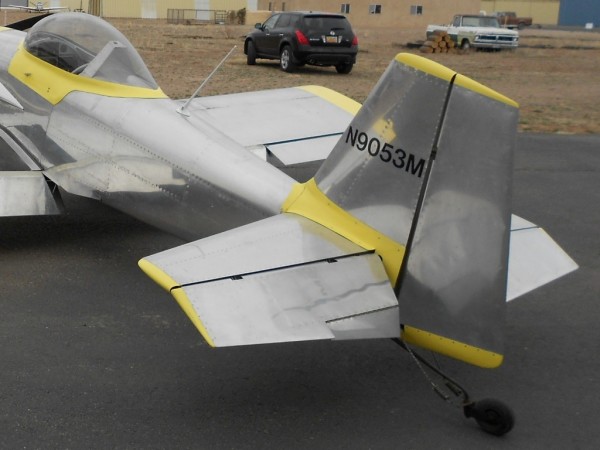
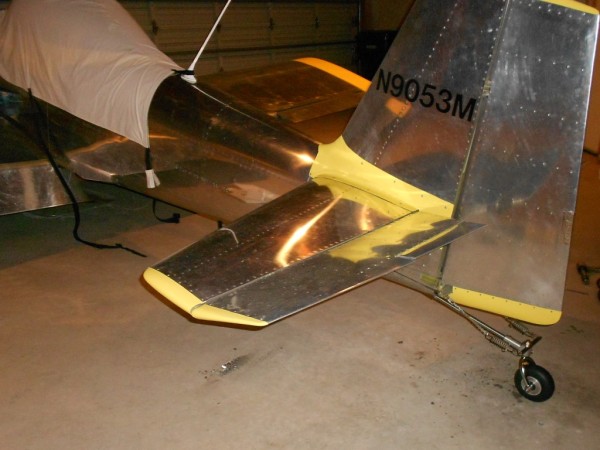
The tail spring and tail wheel on the Van’s RV-3 is a pretty simple setup. However; there are two negatives. First, it is not a full swiveling wheel one has to lift the tail to push/pull it backwards. Second, it lacks ground clearance.
One doesn’t exactly go four-wheel driving with an airplane so why does one need ground clearance?? As you’ve probably noticed from my various posts about backcountry airstrips, camping, and videos (Negrito, Me Own, Grapevine, Double Circle); I don’t always land on paved runways. At many of these strips, the tail wheel sinks in a bit and causes the assembly to kind of plow a trench. The other issue was that even smallish rocks would hit the tail wheel assembly. I’ve even heard stories of people “hooking” the original assembly on rather solid objects like steel grates and damaging the fuselage bulkheads in the tail of their aircraft. So, not exactly four-wheel driving but close.
My plan was to replace the existing tail wheel fork with one that offered more ground clearance and was full-swiveling. What a project this turned into…
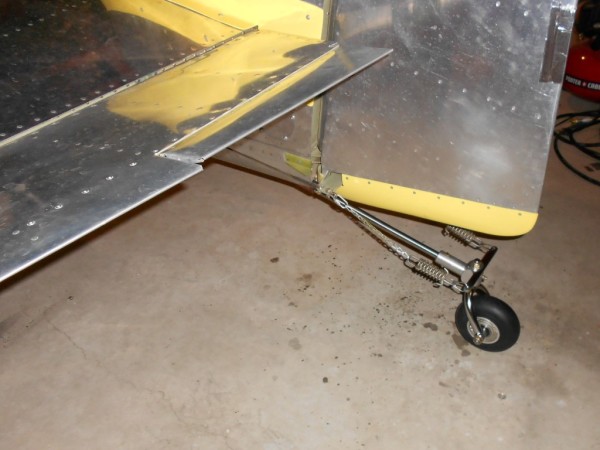
Since the RV-3 does not have a typical RV tail wheel assembly, purchasing just a fork would leave me missing some parts. I shopped around and decided on the Aviation Products tail wheel assembly. It offers huge ground clearance, is very sturdy, looks nice, has sealed bearings in the wheel, and wasn’t terribly expensive.
After getting the tail wheel assembly, it became obvious that the existing tail spring would not work. I originally thought it could be cut and the new assembly slipped into place. No such luck since it tapers. I considered a bushing but this seemed like a lot of extra work.
So, I ordered a new tail spring from Aviation Products.
Ok, all parts in hand – should be a simple afternoon work session.
For the first five minutes, all went well with the tail wheel replacement.
The inspection plate came off just fine. There is a single bolt inside the fuselage thru the weldment into which the tail spring fits. This bolt came out without any issues. However; the spring itself would not budge.
I tried everything that I could think of to get the spring to move. I was eventually able to twist it about 30 degrees and succeeded at getting moved aft about an eighth of an inch.
After several hours, I was ready to admit defeat and just put it back together the way it had been and work the problem when I was in the mood for a challenge. Daisy had a different plan in mind. I could no more get the spring to move forward – so the bolt would go back in – as I could to get it move aft and out.
Great!
I consulted my neighbors and other RV’s flyers on VansAirforce. Lots of ideas sprang forth and I tried them all. Use a rivet gun to drive the spring out, slide hammers, heat, you name it. Nothing would make that tail spring move.
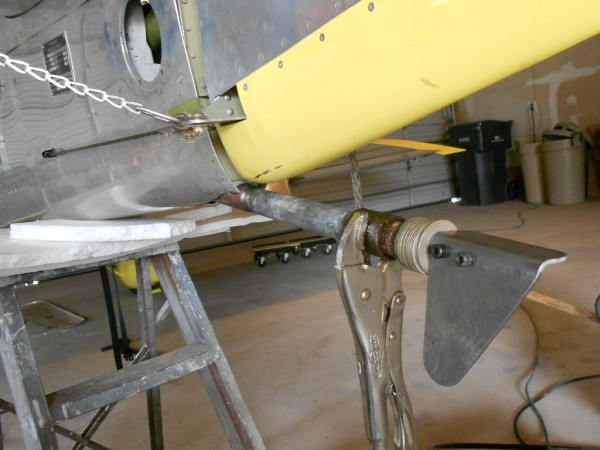
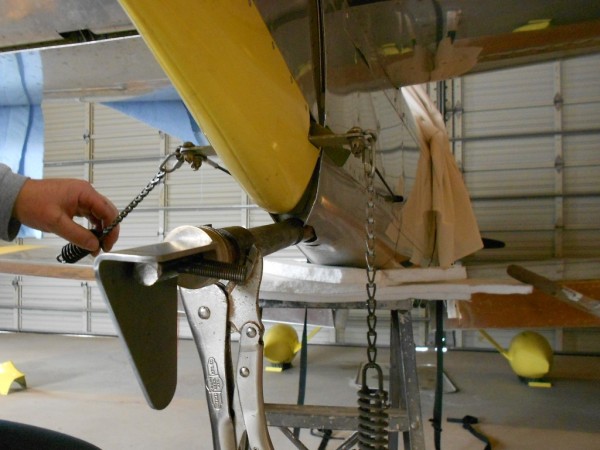
With the help of some friends, I finally “invented” an extraction tool. A piece of threaded steel pipe with a coupler screwed onto it.
The process required two holes to be drilled perpendicular into the spring, near the aft end. The “extraction tool” went over the existing spring and butted against the WD-309 weldment in the fuselage. A steel angle was bolted onto the spring using the two holes. A bunch of large washers added between the “extraction tool” and steel angle to take up the slop. The steel tube and coupler were then unscrewed (increasing their length) which put a “pulling” force on the spring and pulled it out of the weldment. This was repeated half a dozen times adding a few more washers each time.
Of course, it was more work than that. I broke two sets of AN-3 bolts (on the steel angle) before moving up to 1/4″ high strength bolts.
This puppy (spring) was REALLY held in tight. The good news is that the weldment was not buggered up. The new spring went in just fine but not with as snug of a fit as I would like. Will be addressing that. Any time I make a major change without breaking something else, I am pretty pleased!
With the new tail spring in place, the new tail wheel assembly went on pretty easily. Getting it level and drilling a hole to secure it is the bulk of the work.
I’ve now test flown the whole setup and am pleased with it. The over the nose visibility on the ground is improved (raised the tail a bit) but the deck angle at which a three-point landing occurs is reduced. This make it harder to land slow as the tail hits first, forces the main gear down, and the mains like to bounce. If it is all perfectly timed and you roll up onto the mains without bouncing, it is very nice. Otherwise, well… not so nice.
On a really positive note. Neither of the two times that I cracked my head on the elevator required stitches!! Though I did leave a bit of DNA on the floor…


JD
Glad to find your site. I was planning to do the same thing with my RV 3. How has it been working out? I was anticipating some problems getting the old tail spring out and your idea seems like a good one using the washers. How did you later address the looseness of the new tail spring in the fitting? Also some other questions.
1. Where there any weight and balance issues?
2. Is this aircraft products tailwheel a 5/8 inch 20 degree attach fitting?
3. Was the hole for the bolt thru the aircraft weldment hard to drill correctly. I assume you drilled on bench.
4. My RV three has a 3/4 max OD tail spring (I think as it is a mid eighties kit) so does the new spring taper down from 3/4 to 5/8 to fit the tailwheel?
5. Does overall length stay same so rudder cables hoot up with out any problems?
6. Where is your RV3 based?
Thanks
JM
Hi Jim! I’ve now sold my RV-3 but the new tailwheel worked wonderfully for me (couple of years and about 300 hours). The full-swiveling was a back saver and the larger wheel was super on dirt/grass strips. I owned a home and was based at E98, about 30 miles south of ABQ.
If I recall… No W&B issues. Yes, 20 degree tailwheel fitting. I had to use some really thin shims to get the fit snug. I used the existing bolt hole in the weldment and only drilled a hole in the new tailspring. I was very, very careful when doing this to get a good straight hole. My rudder cables connect to the rudder and they stayed the same length. The little chain type “connector” that runs from the rudder to the tailwheel fork needed to be shortened slightly. I believe the new tailwheel was slightly forward of the original.
JD
Is the tail spring you used from Aircraft Products and is it tapered? I now live in Tennessee but spent three years attending college in Albuquerque at UNM. Graduated in 1977.
Thanks
Jim
Hi Jim, I’m afraid all my records went with the plane so I don’t have the part numbers any longer. However; I am nearly positive the spring was tapered.