Missy’s Lithium (LFMP) battery bank (introduced here) is completely computer controlled. Installing it is more complicated than hooking up the positive and negative battery terminals. That said; the fantastic storage capacity is worth the effort!
The first thing I had to do was figure out where I wanted it located. I’m not super happy with the selected location – it is on the passenger side of the rear-most full width bay which is also where the water tanks are located. Once I eliminate the bus air conditioning system, I may have space to move these batteries back a little further and into the same bay as the chassis batteries. We’ll see…
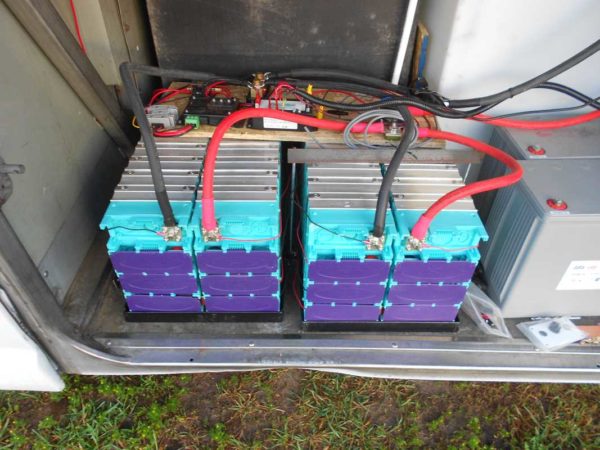
Next on the list was securing the batteries. I decided on a steel frame and hold down clamp for each set of cells. The frame is pretty simple construction using 1″ steel angle. I used my handy dandy metal chop saw (which I love – in case I had not mentioned it) to cut the pieces to length. Then my dandy handy cheapo welder (which I don’t love but don’t hate – it does the crude job that I ask of it) to glue them together. The hold down will be accomplished with some 1/4″ all-thread and another length of steel angle.

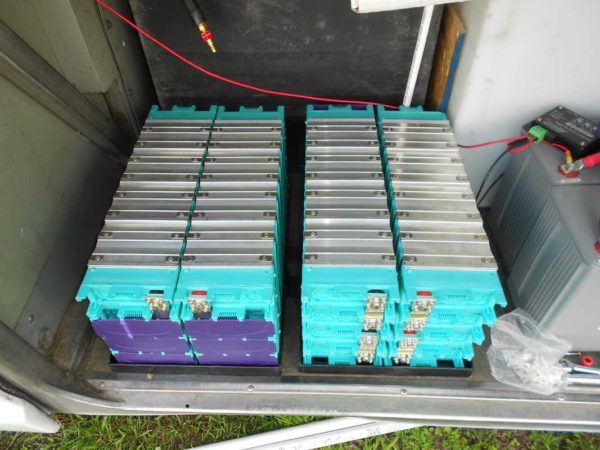
I have four 12 volt, 200 Ah Lithium/LFMP batteries which each consist of four, 3 volt cells (approximately). I needed to connect them in series/parallel to make a single 24 volt battery bank with a total capacity of 400 Ah (doubling voltage (of each set of two) with the series connection and doubling capacity with the parallel connection).
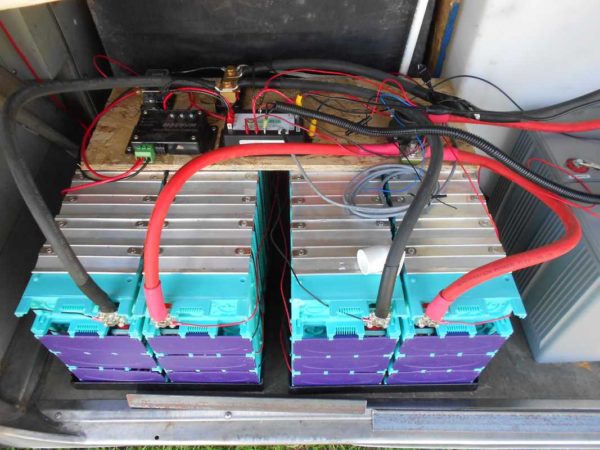
This system uses a shunt on the negative cable to measure all current moving in and out – just like all other quality battery monitors. Each 3 volt cell has a circuit board mounted to it to monitor it’s condition. The ECU (the computer that controls it) is connected to each of these cell circuit boards, the battery, a computer screen, over and under voltage cutoff relays, and a control panel. Figuring out where to put all this and how to route it takes some time.
I’m not totally happy with my answer so it has an “unfinished” look. I’m hoping that I either decide it is the best solution or the best solution pops to mind at some point. At that point I’ll make it permanent. For now, it is mostly all mounted on a sheet of wood mounted on top of the battery cells. Of course, my electrical cabinet in the house does not yet exist so the screen and controls are not mounted in that non-existent spot, yet.
Of course, along the way I was confused by the cell connections – it is certainly not a “typical” battery. I am always very careful any time I am messing with such a powerful and expensive piece of equipment. Blowing my hand off is not very appealing and neither is burning up thousand dollar bills. So, LOTS and LOTS of time spent with a multi-meter making sure I understood what was going on and how this thing works.
After many hours of “thinking” (design time), testing/familiarizing myself, and actually doing something; I am super happy to report that it is working as expected! Watching the computer screen and seeing exactly what it is happening is also very kewl! It is similar to what the Trimetric or Xantrex battery monitors provide but in a larger and ‘all together’ format. Of course, the condition of each cell in the bank is far more than any lead-acid battery monitor can provide.
One thing that I did not prepare for is the 12 VDC power required by the ECU to function. If the ECU is not powered and functioning, the Lithium battery is not functioning (connected to the system). That is a bit of a nuisance as I have a 24 volt chassis battery. Initially, one of the temporary 12 volt SLA batteries was retained to provide that power. Since then, I have added a 24V to 12V step down regulator from the chassis batteries to the Lithium ECU. I think this will work ok as the chassis batteries are charged when the Lithium bank is charged. Time will tell!
None of this is rocket science so nobody needs to be “afraid” of moving to a Lithium battery bank. However; it is not a drop in replacement for lead-acid batteries either (and the good retailers will tell you that). The capacity and capability that Lithium adds is very impressive so I think it has been a super worthwhile installation.


Glad I’m on the sidelines watching this part of the project! I have no idea what you’re talking about but it all sounds most excellent!
Well done Jon!
Thanks Rick – remember me fumbling around trying to tie a fly?!? This is the same thing only different. 🙂
You know I am counting on you to get all this solar and lithium stuff all figured out so I can just copy it in 2 years on my yet to be purchased (or even found) Foretravel Grand Villa, right?
Very nice choice Mike! I understand. However; in two years everything will have changed. By then, we’ll all have personal fusion reactors about the size of a pint jar that we just take with us and plug into whatever thing we are using (car, house, motorhome, airplane, etc…). Kind of like a ZPM if you are a Stargate SG-1 fan! Technology you know… 🙁
Better you than me!!!!
Do I cut the green wire or the orange wire?!?!? And… is that orange or light brown…. 🙂