I suppose it’s about time to mention Missy’s plumbing again.
By the way, I just had a good friend have some plumbing work done and I will NOT, EVER, be installing a hose that long up Missy’s nose and into her holding tank!!
Since the last installment, the plumbing plan has been devised and partially put into action.
I had a few demands:
- All water coming into the coach (filling the fresh water tank or going directly into the house) must be filtered.
- All water coming out of the fresh water tank and into the house must be filtered.
- The water pump must be quiet.
Easy enough.
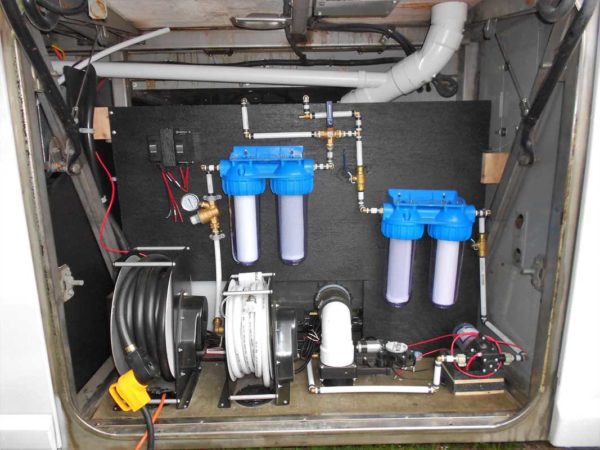
I have two sets of two filters. Each set has one sediment filter and one carbon filter.
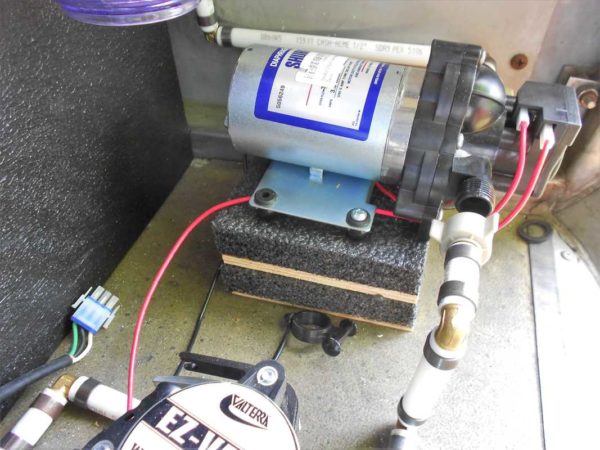
The quiet water pump is not as easy. They all make a ratcheting/banging type of racket – a combination of noise and vibration. I am trying the following homemade water pump “mount.”
It is just a couple chunks of soft foam with a couple pieces of plywood – all glued together. Simple idea – the pump is floating on foam and none of the mounting screws (to pump or chassis) are connected – except thru a layer of foam. The whole assembly is mounted with screws from the bottom plywood into the chassis and screws from the pump only into the top piece of plywood. Hopefully vibrations are isolated from the chassis by the foam. Of course, some of those vibrations probably pass thru the plumbing itself. The solution there is to use soft hose before and after the pump. Time will tell if it passes my test.
The wet bay, which is not exclusively a wet bay, is slowly coming together. If I could manage to get all the necessary plumbing parts – connectors, adapters, fittings, and everything else – all in one trip to the store I probably would have been done with it weeks ago.
Both the water hose reel and shore power cord reel are powered. Meaning, you push a button and the cord/hose are pulled in and rolled up for you.
AND!!
The waste dump valve is also powered. Push a little button from inside and WOOSH – away it all goes!! Definitely a “need.”
Ok… ok… Not really a need. But pretty cool.
One thing that is always “discussed” among RV’s is opening the dump valve while traveling down the road and dousing the fellow that is following too close behind. I did NOT install this powered valve for that purpose! My poor Jeep would be a MESS!!!
I actually got it to use while sitting at a campsite with full hookups (and once already hooked up, of course). Many times, after running several loads of laundry (or whatever) one needs to empty the tank. Rather than walking outside, opening the door, and pulling the lever. I will simply push the button. Hee-heee! Hmm… maybe if I could set it up on a remote control….
I installed three inch “doors” or “cable hatches” thru which the cord and hose pass to the outside and a partial door closes to prevent rodents from climbing up the cord/hose. The little doors fully close when not in use. No, they are not powered – purely a manual device. 🙁
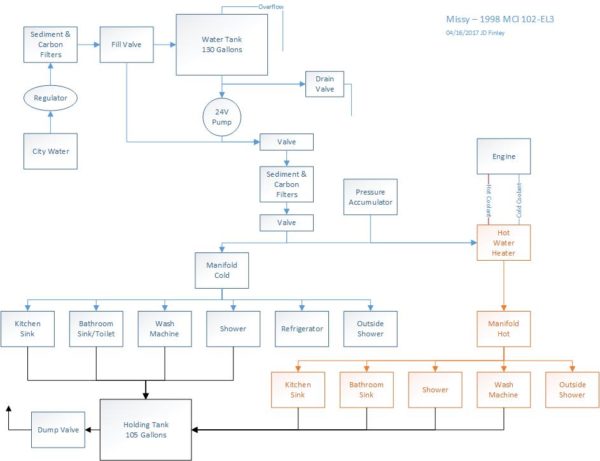
The design of the plumbing system looks like this:
Note: For the latest/greatest diagrams, refer to this page about Missy.
Nothing particularly fancy about it. Oh, maybe one thing… I permanently installed a quality pressure regulator in the city water line – before the first set of filters. I did this so I would not need to install a regulator at the water post. Why?? Well… I hate to admit it but I have left more than one regulator behind. You would think it would be an easy thing to remember when you are disconnecting the hose but for some reason….
I do not have the engine coolant connected to the water heater yet, that is a much lower priority so has to wait. Of course, I don’t have most of those other things either – shower, wash machine, bathroom sink, etc…


I have been following your build and enjoying it, thanks for sharing.
I hate to say this, however 5 microns is not going to remove anything biological such as cysts, bacteria, viruses and such, …the real nasties… It will remove sediment and the carbon will help with chlorine. That’s about it, so as long as you use municipal water you should be ok. Wells, lakes and such are a different story.
Perhaps you will only connect to city water. I just wanted to make sure that you were aware and didn’t have a false sense of security that you would be safe due to the filtration. And even if the water was properly treated, you are still dependent upon the pipes that transport it as those are often the biggest problem due to age, condition, past breaks and repairs… Let me know if I can assist.
The following is just a quick summary of the size of these contaminants:
https://www.wqa.org/Learn-About-Water/Common-Contaminants/Bacteria-Viruses
I hope that it helps.
Take care and keep up the good work,
Ken
Thanks Ken – EXCELLENT POINT and great info!! I bought those filter assemblies and didn’t even pay attention to the details of the filters themselves. I would have gotten around to it eventually (like the first time I changed) them. 🙂 I’ve already added some .5 micron carbon filters in my Amazon cart!! Oh, yes, I always fill water from a “reputable” source. It isn’t always a city – sometimes a friends well or campground well but never from a lake/stream.
Have you considered add an external faucet for hot and cold water? Most of the larger Foretravel motorhomes have an outside hand washing station with a faucet, paper towel, and soap dispenser in the same bay with the sewer hose connections. It looks like a really handy feature. great for cleaning up a mess, and handy for other purposes.
Hi Mike! Yes, that is what I have labeled as “outside shower.” That’s probably a boating only term but definitely a very useful feature.
Boy, you are smart!
No, sorry Ronda – I will not be loaning out Missy to family to make trips to Florida. 🙂
I appreciate the input about your project.
I see you are having the challenge I had with a noisy pump. My final solution was the connection from pump to water system.
I went from a stiff plumping connection to a 12″to 18″ flex/steel braided line between pump and the pex line. The type used for bathroom supply lines to attach the
faucet to the hot & cold supply.
Good tip Dantz! I may make that change now – it probably means a couple more trips to the hardware store to get the right parts though…. 🙂
All of that plumbing and hardware looks amazing.
I like your power dump. Several times since being here in Beckley and not moving I have had to go out in the rain to pull the grey tank. Not a big deal except one time I was already in the shower when I realized I needed to do that. The button would have been very nice at that point! Where did you buy that dump valve?
Great example and real world experience Pete! It is a Valterra E1003VP EZ Valve 3″ Electric Waste Valve System. That link is to Amazon where I purchased mine. It seems like your grey valve is 1.5″ (or maybe 2″) but I cannot recall exactly. I did a quick search and didn’t see that size – I bet it exists somewhere though.