Note from JD: Note that the entire system listed below was removed and re-installed on my new Newmar Dutch Star – here. Also, I have recently completed the installation of a 1720 watt system on Missy, my current home (May, 2017).
I am so excited!! I have working solar charging system running in my RV!!
There are a boat load of options when it comes to solar electricity. Because of all these options, questions, and decisions; I thought a kit would be the way to go – take advantage of someone else’s labor and all that. I should add that I have a gas powered generator in my motorhome. This means that solar is not my only source of electricity. However; I really enjoy peace and quiet and the gas generator is neither. Most of my camping is boondocking, off the grid, and in out of the way places.
So, I started searching the solar kit world. I found lots of kits but none of them exactly fit what I wanted – either in terms of physical panel size, system output, equipment manufacturer, or cost. The final kicker was the shipping cost for solar panels. It is crazy. So, I decided that a DIY system was in order.
The first decision to make are the panels. I have limited space and wanted as much output as possible. From this I learned that the newer high voltage panels are the best way to go. These solar panels are often used commercially and on solar homes. I am not expert and can’t tell you the difference (other than voltage) but research shows that the solar cells used in contructing these photovoltaic panels seem to start producing current earlier than 12 volt panels and keep producing it after other panels have stopped (sunrise/sunset). Purchasing local would eliminate shipping and save money. I found reasonably priced SunPower E20, 327 watt solar photovoltaic panels available within just a few miles. I purchased two of them for a total of 650 watts.
With these high voltage panels, the choice of an MPPT (maximum power point tracking) charge controller is a no brainer. There are several good manufacturers and I found a good deal on the MorningStar TriStar 45 amp MPPT charge controller (here on Amazon). Yes, they cost more but they are worth it in my opinion and in this scenario. Obviously, there are many different scenarios/solar charging systems so you have to judge based on what you are constructing. A little side benefit of the high voltage solar panels is that you don’t need cables as large as you do with a 12V system between the solar array and charge controller.
Finally, I just needed some cables, connectors, fuses, and mounting hardware. Some of this I ordered from Amazon and eBay, some I constructed myself (brackets, mostly).
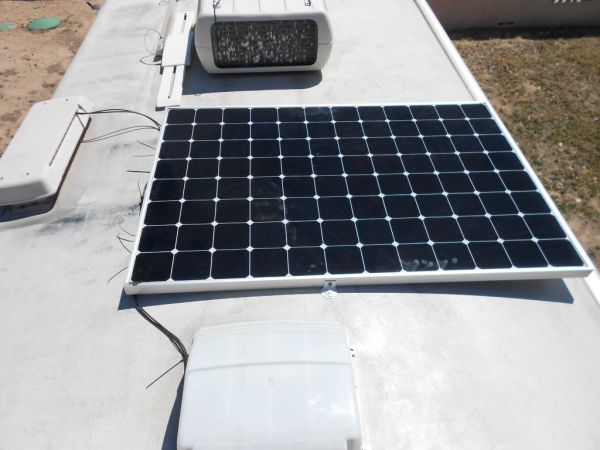
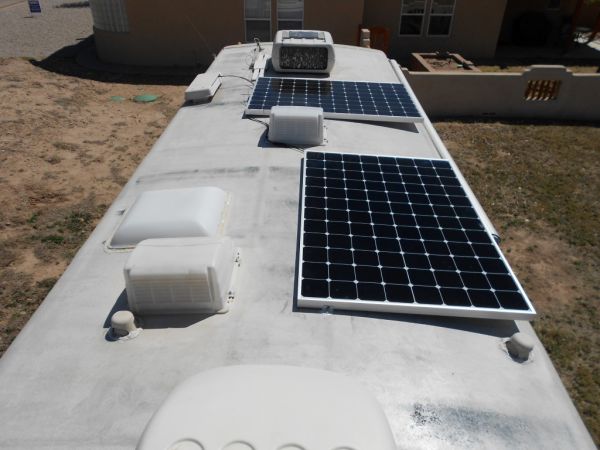
Each solar panel measures approximately 41.5″ by 61.5″. This is big and finding the necessary space on the roof was a challenge. The spacing of two air conditioning units, two vents, two plumbing system vents, refrigerator vent, and television antenna is such that there aren’t many large, unoccupied areas left. Adding to this, the panels should be as far as possible from items that may shade them. This includes the vents and AC units that I was installing next too! I did the best I could.
It is worth noting that these panels are high voltage house type panels. In the past, one typically used 12V solar panels on boats and motorhomes due to charging a 12 volt battery. However; the MPPT charge controllers are doing away with that ‘standard’.
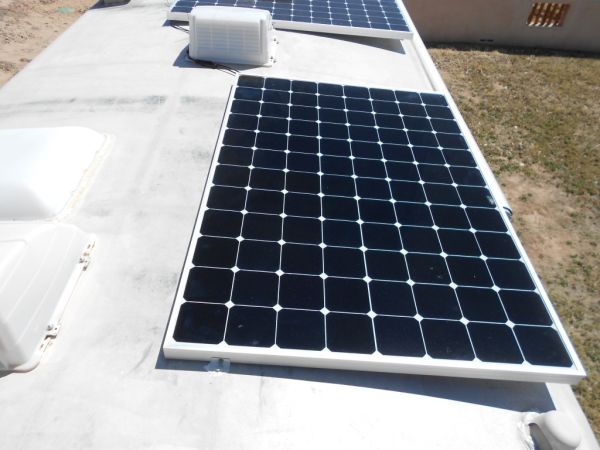
The first big surprise came when I laid the panel on the roof. I knew the roof was rounded but it is REALLY rounded. I would need to construct a raised mounting bracket for the outside edge of the motorhome. I did this with some steel tubing and large washers.
Rather than shoot for equally spaced brackets connecting the panel to the roof, I shot for hitting the steel beams in the roof. I used fairly large lag screws. This seems to have worked as the panels are very firmly attached. As always, lots of Dicor roof sealant was used. I laid a puddle under each bracket and then coated the bolt heads. Water has a way of penetrating anything if even remotely possible so you can’t hardly go overboard on this step.
Note from JD: In the above photo, you get an idea of how the roof looks after cleaning as described here.
Many people have reported success running the cable from the panels down the refrigerator vent. This would work perfectly for me as there was a batch of cables entering my wiring “cabinet” (more like an “area”) at the bottom of this vent. I asked about protecting the cables with something and was told that just keeping them secured and away from the propane burner was sufficient. So, that’s what I did! So far, it is working just fine.
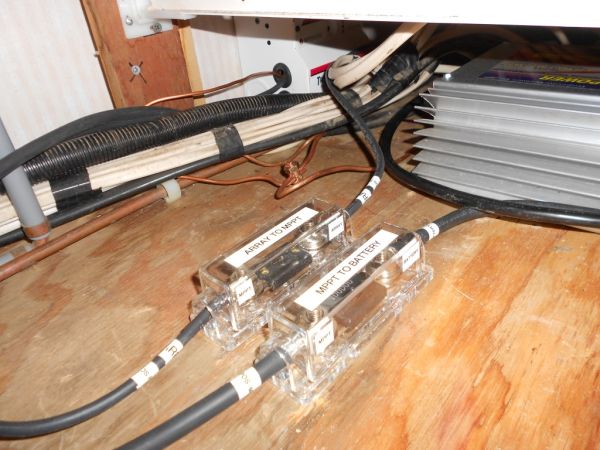
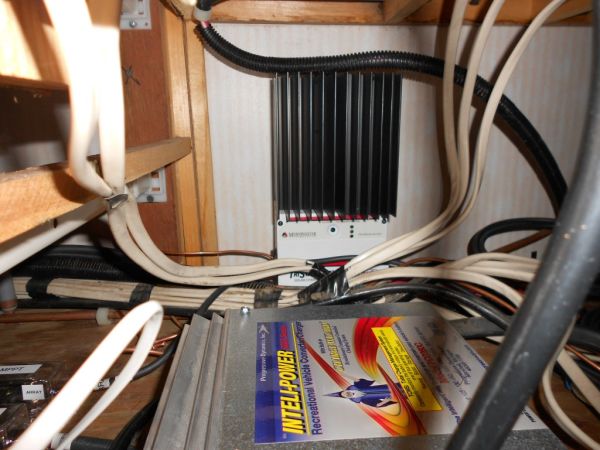
My wiring “cabinet” is in a very poor location. I think Fleetwood built the motorhome around it as it is nearly impossible to get into and actually accomplish anything. In spite of that, I was able to mount the MorningStar charge controller, fuses, and run the cables with a fair amount of pain and suffering (laying on the floor, reaching thru drawer openings, standing on my head, etc…).
The MorningStar TriStar manual says that charge controller should be mounted vertically for proper cooling. That added some difficulty but I pulled it off.
I installed AN 80 amp fuse between the solar array and charge controller and another 80 amp fuse between the charge controller and battery bank. Better safe than sorry and even these large fuses don’t cost very much.
When I tested the output of the first PV panel, I was getting approximately 55 volts and 5.5 amps! About 300 watts – Pretty impressive!
Connecting everything up is largely an exercise of ensuring that polarity is correct and remembering that you are dealing with high voltage power. To aid my well being, I disconnected the panel (up on the roof) while messing with the wiring. I also put a blanket over the panel whenever connecting/disconnecting it.
My total system consists of the following:
- Two SunPower E20 327 watt PV panels
- MorningStar TriStar TS-MPPT-45 Solar Panel Charge Controller
- One 50′ MC4 extension cable (cut in half)
- Two 6′ MC4 extension cables
- One set of MC4 two-to-one adapters
- Twelve Z brackets
- Two 80 amp fuses and AN fuse holders
- Scrap welding cable, crimp on cable connectors, aluminum angle, steel tubing, nuts, bolts, and washers.
Total cost was pretty close to $1,200.00.
I didn’t keep very close track of my time. Probably 15-20 hours of fabrication and installation time. Of course, I spent a great deal more than that researching and learning.
So far, I am very happy and have electricity far in excess of my needs but I am sitting at home. I hope to make a couple week trip starting in a couple days and that should be a real test!!


Hy I’m about to embark on putting solar onto my RV. Would you still recommedn all the item above? Would you do anything differently? THanks!
Hi Jon – yes, I still recommend those products. I believe that the name brand components are usually worth the cost over the cheap stuff.