White Mesa is a crazy-spectacular ride!! WhooHoo!!
White Mesa is a treasure! It is a bike trail (or trails, if you prefer) on (mostly) BLM land that covers some spectacular scenery. It is northwest of Albuquerque, NM and getting there is about a 90 minute drive for me (and there are about 5 miles of dirt road). It seems like everywhere you turn there are vertical cliffs or, if your lucky, just a 60 degree “slope” for you to fall off!! The trail is mostly very firm with a fair amount of rock, some thrilling descents and some hard climbs – for me at least! I’m a poor one to rate it as I am a beginner but it certainly has some technical sections and is not an easy ride.
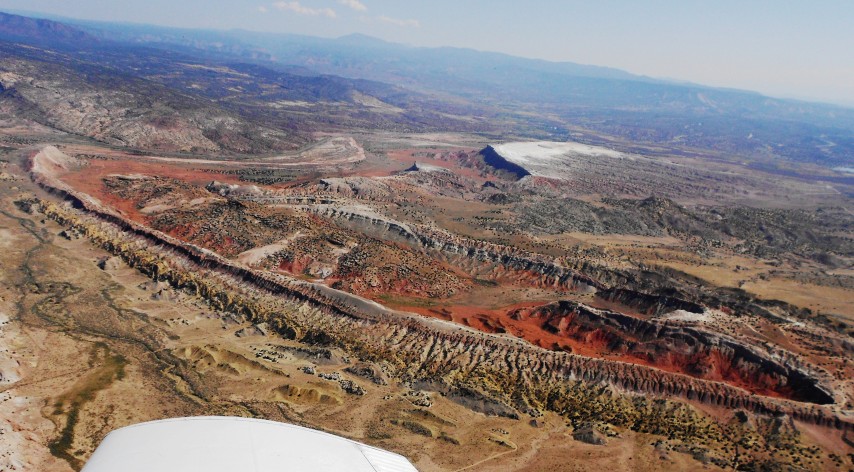
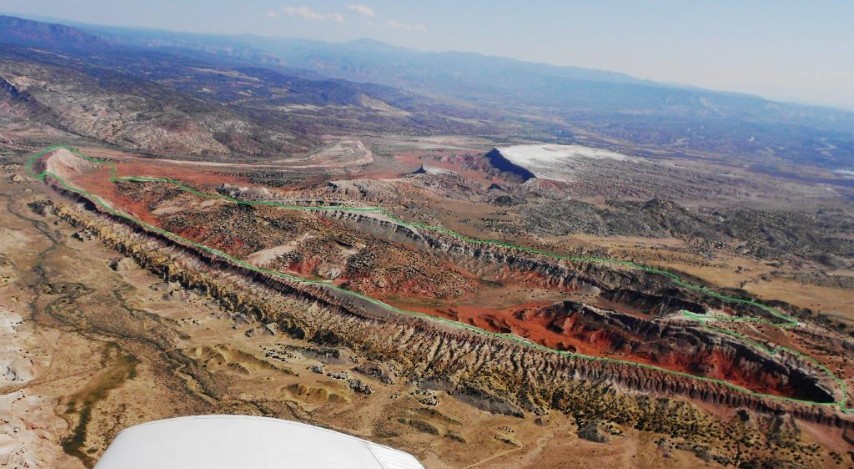
Take a look at the following White Mesa photo that I took from the air the day previous to my ride – I was scouting the area! The photo is looking northeast. The parking area/trailhead is at the bottom-right of the photo. The Dragon’s Back is to the far left end of the loop. I have added the trail with a green line to the second copy give to give an idea of where this trail goes and some orientation for the gallery of photos below.


The BLM website says this about White Mesa:
“Tucked away in rugged and scenic country southwest of the community of San Ysidro, New Mexico, is the White Mesa Bike Trails Area. Just to the west is the newly designated Ojito Wilderness. Both sites are a short distance from U.S. 550. This region is known for its geological, cultural and paleontological resources, as well as for its scenic qualities. The bike trail crosses a landscape of spectacular beauty and exceptional geology, meandering through the Pueblo of Zia, State of New Mexico, and public land managed by the Bureau of Land Management (BLM). BLM has obtained rights-of-way from the Pueblo and the State to provide this biking experience. Although the Trails have been developed primarily for mountain biking, hikers are welcome on the entire trail system, and one segment is also open to equestrian use.
White Mesa is named for the color of the gypsum that forms much of the mesa and the majority of the bike trails. Gypsum is a white mineral consisting of hydrated calcium sulfate and is commonly used in cement, plaster and fertilizer. This gypsum formed as a chemical reaction from evaporation of an ancient water body. In other words, the Ojito area was once covered with water! At the western edge of White Mesa, the Tierra Amarilla Anticline forms high, narrow mesa ridges. This classic example of a plunging anticline is visited by several university field schools each year.”
I arrived fairly early and started my ride at about 9 am while it was still cool. I fully expected this to be a real learning experience. I have never done any trail work like this and, believe it or not, no real climbing. At this point, it’s ok to laugh – I suspect if anyone at the trails knew this they would have laughed in my face! That’s ok – I learn by doing so time to do some learning.
There were four cars in the parking area but not a soul to be seen. FANTASTIC!! I love solitude.
The White Mesa trail starts climbing nearly immediately from the parking area. It is semi-washed and semi-rocky. I got about 200 feet up the trail and learned my first three lessons in rapid succession. Real steep climbs require the lowest possible gear (granny gear). When in this gear, you are not going very fast but are pedaling like crazy. Ironically, when not going fast, bike control and balance really become important. If you are timid and lacking in balance, being able to get your feet off the pedals and onto the ground quickly is really important. So, three important lessons learned. 1) Work on slow speed bike control and balance. 2) Toe clips are really hard to get your feet out of FAST. 3) The ground is hard – mix some rocks in and it really get’s your attention.
Ok, dust wiped off and a subtle look around indicates that nobody saw the “tip-over”. A very good thing as watching a fat guy fall is always so pathetic. So, I take stock of the lessons learned and carry on.
After a short climb the trail opens up to show you the gorgeous canyon. Time for lesson #4 – I am STILL afraid of heights. Riding three feet from a 300-400 shear cliff most certainly gets my heart pounding. Toss in a little of lesson #1 (need to work on bike control and balance) and my heart feels like it is going to beat out of my chest (or so I think…). Ironically, I flew over the area the day before the ride (and took the accompanying photos) so I knew that what was on the opposite side of the trail from the cliff walls wasn’t much better.
It’s kind of amazing how a couple miles of semi-technical trail with a cliff on both sides helps you to focus and rapidly improve your skills. However; this quickly brought on lesson #5 – a full rigid frame and rocks don’t seem to like each other.
So, I’m making progress – about 3 miles in, enjoying the scenery and solitude, getting better at managing the trail and bike and then there it is – the Dragon’s Back. I had seen some photos online but I was not prepared. This thing is easily 300′ or more high with a nearly vertical cliff on one side and about a 70 degree slope on the other. On top, is a little single track trail and that’s it!! From some angles, there doesn’t even appear to be room to stop and dismount. Lesson #6 – I am a chicken. However; I already knew this about myself so perhaps this is not a real lesson – more of a reminder.
Lucky for me, there is a trail down to the canyon floor previously created, apparently, by other chickens. It is a narrow trail that switchbacks back and forth along a very steep hillside. I tried to ride the straight stretches but the switchbacks were to much for me – I had to walk them (see lesson/reminder #6). It’s interesting to me what chickens will negotiate when the other option is WORSE!
After getting off the Dragon’s Back, there is some double-track to follow – with a few stretches of sand. Here, I was served a reminder of lesson #2. The good news is that I also worked on lesson #1 in this stuff and gained (I think) some sand riding “finesse”.
Around I go – still loving the scenery and solitude and I get to see the descent off the north end of the Dragon’s Back. Oh My Goodness!!! Crazy people – not sure what else could explain it. Even if I had ridden the Dragon’s Back – I don’t think I could have ridden the descent to get off! From the bottom, it looks like a vertical wall of rock. Obviously, a trail though it all though – Yikes!
I finally get to The Springs which is not where you can fit different suspension components to your bike. Instead, they are a series of little springs of water coming down and out of the mountain. I wish I was a geologist to explain the mountain but I’m not – maybe the photos will tell the tail. In short, you could tell the rock was hollow underneath you in places – probably hollowed out by water. Pretty neat. Then the climbing started.
Up to this point, it was mostly downhill with a few short climbs. Now, it appeared to be all uphill – a long ways up hill… I did my best to be ON my bike as much as possible but there were some places that I’m not sure anyone but super-humans could ride up using super-equipment. I did learn another lesson thru here. Lesson #7 – I may be able to produce a lot of climbing power by using granny gear, standing up, and power pedaling but if that rear tire is just spinning, things get interesting. Of course, by things, I mean previous lessons – namely #1, #2, #3. After a little experimentation, I think I gained ground on #1 by figuring out how to keep some weight on the rear tire while powering up these steep inclines. Oh, this lead to the understanding that my chest did not actually feel like my heart was going to pound out from fear of the cliff as I mentioned previously. I know this because NOW my heart really felt like it was going to pound out of my chest from all this aerobic – climbing activity!! Needless to say, I stopped often to recover and prepare for my next heart attack.
I eventually worked my way up and around spent a lot of time taking photos as the scenery was just so great!!
The survey marker (bench mark) in the photo below was at the top of the highest point in the photos (that is part of this canyon/mesa). My hand is resting on it in self portrait. Standing on top of that point is NOT comfortable for me (lesson #4). I have to chuckle looking at that photo – I needed something to hold on to!!
Arriving back at my vehicle there was a gentleman there just getting ready to start his ride. He looked at my bike and asked “You have no suspension?” I laughed and we talked. He gave me a number of good tips – I didn’t get his name but if you happen to read this – Thanks for the info and encouragement!
It seems that I required nearly three hours to make the 8 mile loop. That’s a pretty bad average considering, on flat ground, I usually maintain something closer to 14 mph. Taking photos takes a lot of time, repeated recovery from 240 bpm heart rate takes a lot of time, and sitting still enjoying the peace, quite, and solitude of God’s fantastic creation deserves a lot of time! Thus, my lousy average speed.
It’s very frustrating to me that the photos of White Mesa have to be reduced in size for posting here. They are spectacular when full size and with a little explanation but I know nobody wants to download 700 Mb of my photos! 🙂 Enjoy them nonetheless. Many of them show the trail – from those perspectives, you can get a feel for the fact that the trail is up on top of the upside down V ridgeline.


Just rode White Mesa yesterday for the first time and wished I’d brought my camera. Would love it if you had time to email me a few photos in a larger size. Thanks!
Hi JD, I’m working on a project on aerial geology and I’m interested in your photos of the Dragon’s Back/ White Mesa. Could you email me at caperton27@gmail.com to discuss terms of use for your photos? Do you have high-resolution files? Thank you! Mary Morton